According to the Skin Cancer Foundation, Mohs surgery is considered the most effective technique for treating many basal cell carcinomas and squamous cell carcinomas, the two most common types of skin cancer. Sometimes called Mohs micrographic surgery, the procedure is done in stages, including lab work, while the patient waits.
Processing tissue as full section mounts makes Mohs surgery go much faster, it can cut the grossing, embedding, and cutting time in half. This is my technique for doing full section mounts using the reverse slide embedding method.
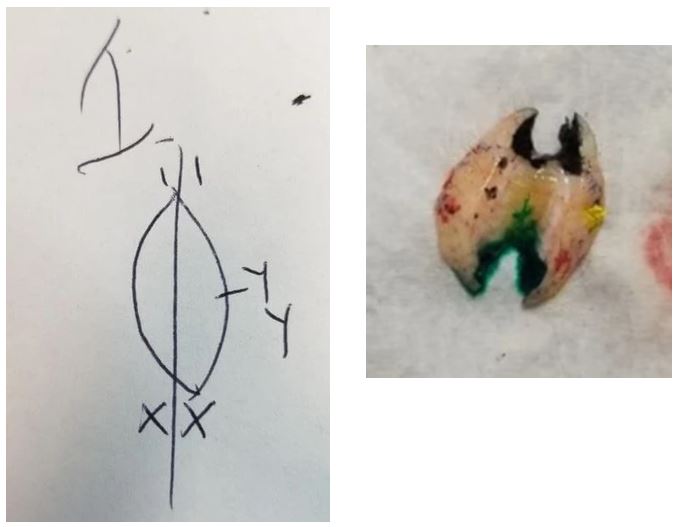
When you receive the tissue, wash any blood off with saline and accession it as usual. Imagine the tissue looks like a clock face. You will make small cuts at 12 o'clock, 3 o'clock and 6 o'clock about 2-4mm long. If the tissue does not lay flat, make releasing cuts along the top of the tissue, careful not to cut all the way through. A releasing cut following along the skin edge of the tissue about 2-4mm in and a waffle pattern of cuts in the middle should make it lay flat. Ink the cuts in 3 different colors and mark them on the map. I usually use black at 12 o'clock, yellow at 3 o'clock, and green at 6 o'clock.
Put a drop of embedding medium on a clean slide and spread it out with a gloved finger, change your glove. Using forceps, move the tissue onto the slide and press it down into the medium.
Look under the slide to see if there are any air bubbles trapped underneath the tissue, press them out if they are there.
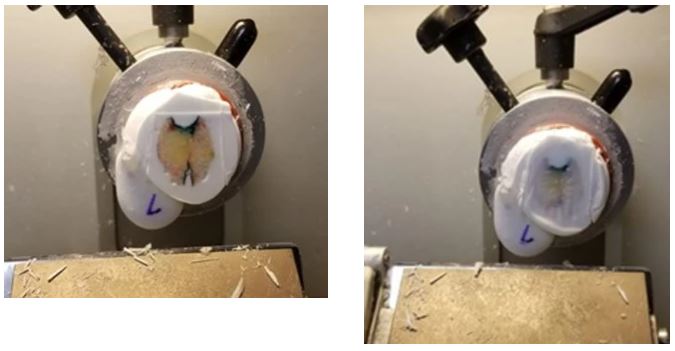
Once the tissue is flat, skim the slide flat across the top of a frozen heat extractor, one side at a time while holding down the skin edge with forceps as needed until frozen down, the medium will turn white. The opposite skin edge of the tissue should not be touching the heat extractor while you do this, it should be hanging off the edge. This takes about 10-20 seconds so work quickly. After the first side is done, turn the slide and hold down/ freeze the other side of the tissue. The entire piece of tissue should be on the heat extractor now. If you need to adjust part of the specimen after it has frozen, place your finger under the slide, under the area that needs to be moved, wait until it defrosts and the medium turns clear again, then move the specimen, freeze again while holding in place with forceps.
Place the tissue in the cryostat to freeze then cover in embedding medium and freeze again, freeze spray can be used gently to speed this step up. Once the tissue has been flipped onto a chuck and has frozen again, gently pop the slide off the tissue. If it will not move, try warming it with your hand for a few seconds.
If there are holes/ spaces around the tissue once embedded and faced, cover the tissue in a thin layer of embedding medium with your finger, press it into the cracks and holes. Let it freeze. Back up and reface the block. This will help the sections stick to the block and will allow you to see if the full epidermis is separating from the medium when cut, reducing the need for a magnifying glass (the epidermis will usually separate from the medium if the full skin edge has been exposed).
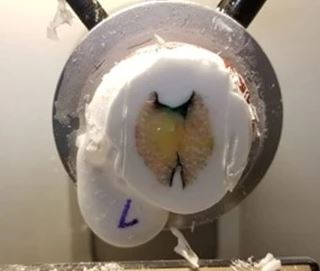
 If you used too much embedding medium, use a scalpel to trim the block. Cut 2 lines into the block from top to bottom on either side of the tissue. This will reduce the layering of the sections and medium so the sections will stick to the slide better during staining.
If the tissue is fatty, you can paint it with liquid nitrogen using a large fluffy paintbrush 10-15 times to make it section easier. The fat will turn white and stay white when it is ready to be cut, try to avoid painting the epidermis as this can make it friable. Start taking sections after a few slices, the first few slices will not be whole, but it should section fully and thinly after 3-5 slices.
If the tissue sections fall off the block after being cut, you can press your fingertip to the top of the tissue to warm up the medium a little bit so it sticks better.
Let the slides dry for a 30s - 2 min before staining to reduce the chance of sections falling off during staining.
Written by Zipporah Cassidy
#2020#GeneralAnatomicPathology#Blog